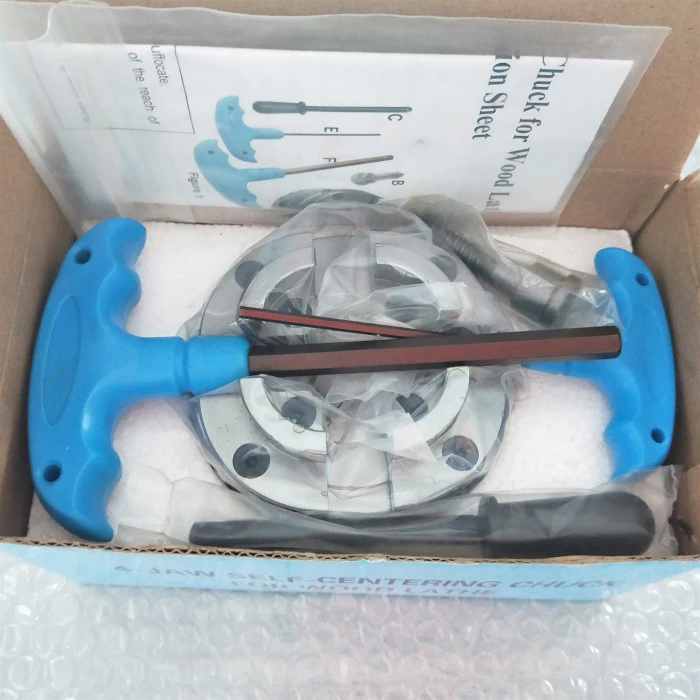
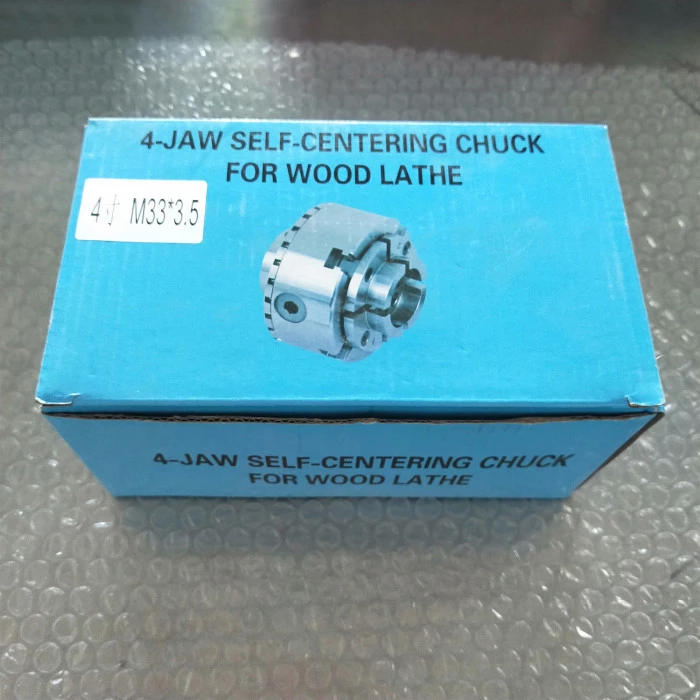
4 Jaw Self-centering Chuck For Wood Lathe
4 Jaw Self-centering Chuck For Wood Lathe, Wood Lathe Chuck, Wood Working Scroll Chuck, Soft Jaw Chuck, Independent Jaw Chuck, Mix Jaw Chuck, Wood Bowl Chuck.
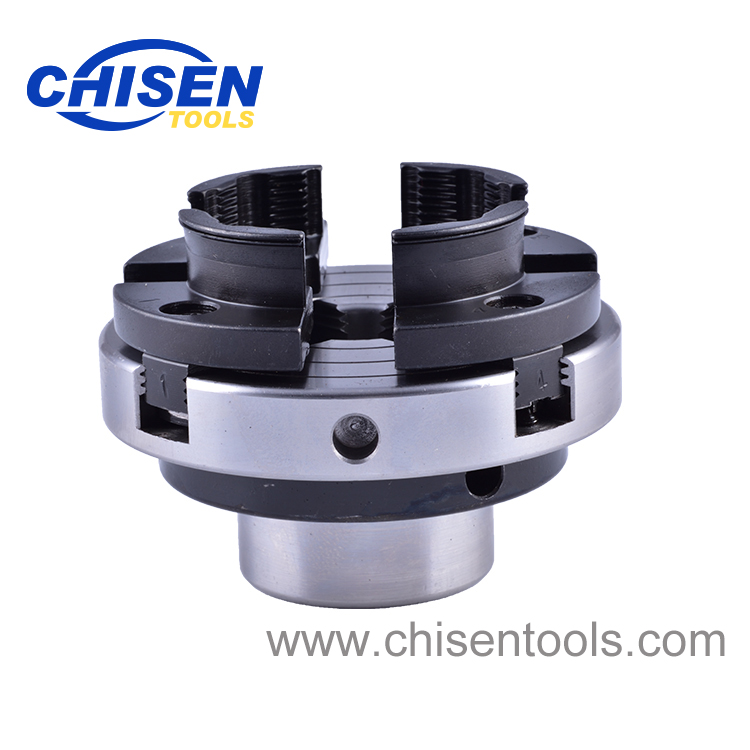
4 Jaw Self-centering Chuck For Wood Lathe
Artical No.: CS40031
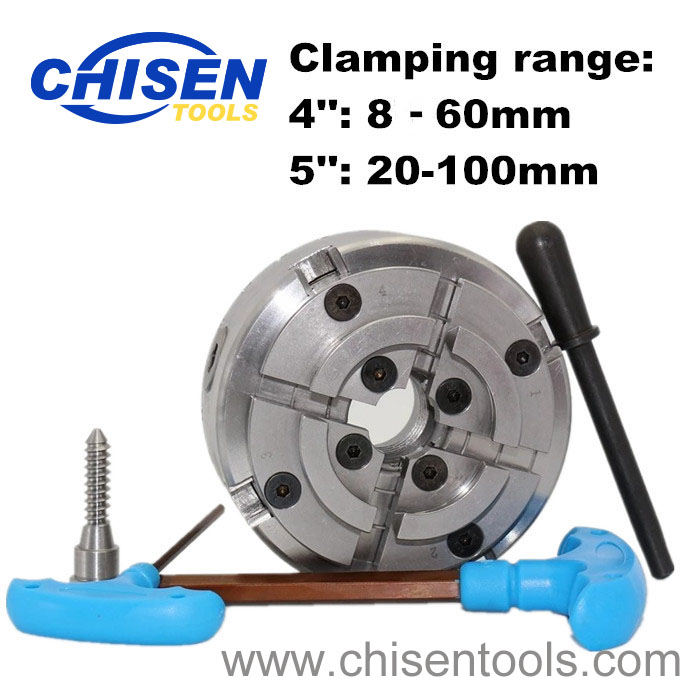
Size: 4" 5"
Material: Carbon Steel
Type: Self Centering
Grips: Internally and Externally
Usaging: Clamping, for Wood Turning Lathe
Suitable for: Pipe Fitting, Logs, Square Wood Processing
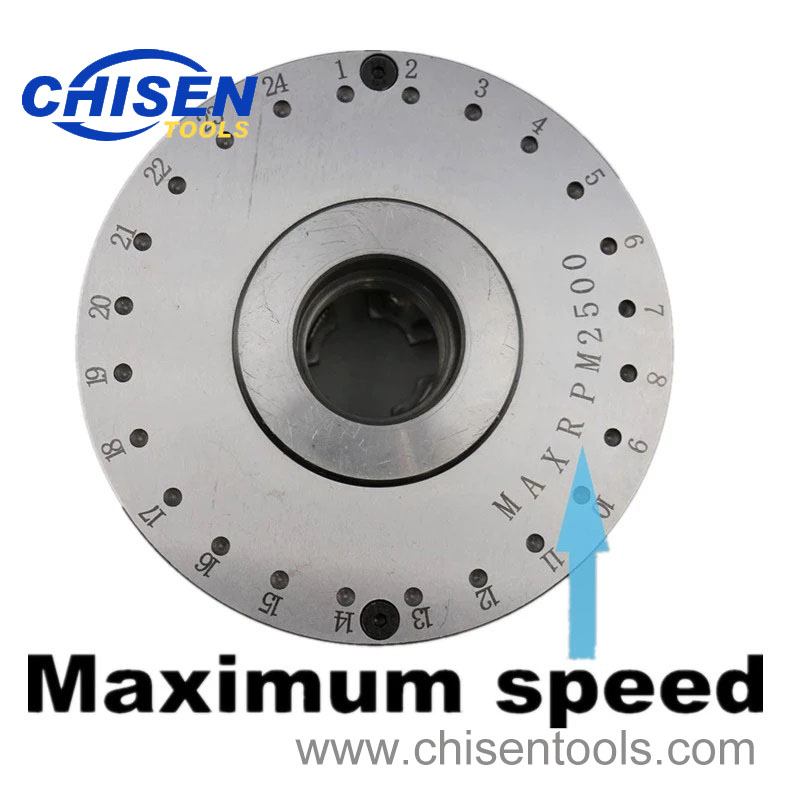
Features: Made of C1045 Carbon Steel, High Hardness, Long-lasting Life, Suitable for batch processing, Speed up to 2500rpm.
| Size | Clamping | Thread Connection | Weight(KGS) | ||||
| 4" | 8-60mm | M33X3.5; M40X2 | 3.4/4 | ||||
| 5" | 20-100mm | M45X2; M40X2 | 4.3/5 |
How To Use Bowl Chuck Wood Lathe?
We need to celebrate the four-jaw bowl chuck, because it is a spectacular tool! This bowl chuck is a must for any serious bowl turner. Turning is easy and safe with the four-jaw wood chuck’s underlying advantages of stability, strength, and ease of use.
We will explore the integration of the four-jaw chuck in the wood bowl turning process. Then we will discuss how the chuck works and how to go about selecting the right wood bowl chuck or rather chucks for your particular needs.
Wood Chuck History
It’s interesting to note that the four-jaw chuck has only been used for a few decades in the woodturning world. Some enterprising woodturners, frustrated with limited chucking options, borrowed the wood bowl chuck idea from the metal milling world.
Initially, turners were using slightly modified metal milling chucks on wood lathes. A spigot chuck was used exclusively for awhile around the 1970s. Through the years, the four-jaw wood bowl chuck evolved and is now designed solely to turn wood.in the woodturning world. Some enterprising woodturners, frustrated with limited chucking options, borrowed the wood bowl chuck idea from the metal milling world.
And if you’re wondering, there are a few other names for the bowl chuck. Additional wood bowl chuck names include: four-jaw chuck, scroll chuck, lathe chuck, and spigot chuck.
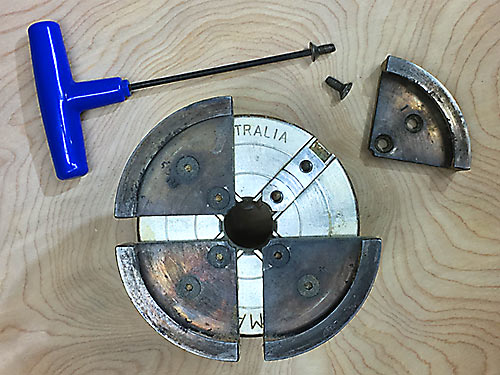
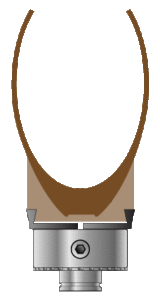
PARTS OF A FOUR-JAW CHUCK
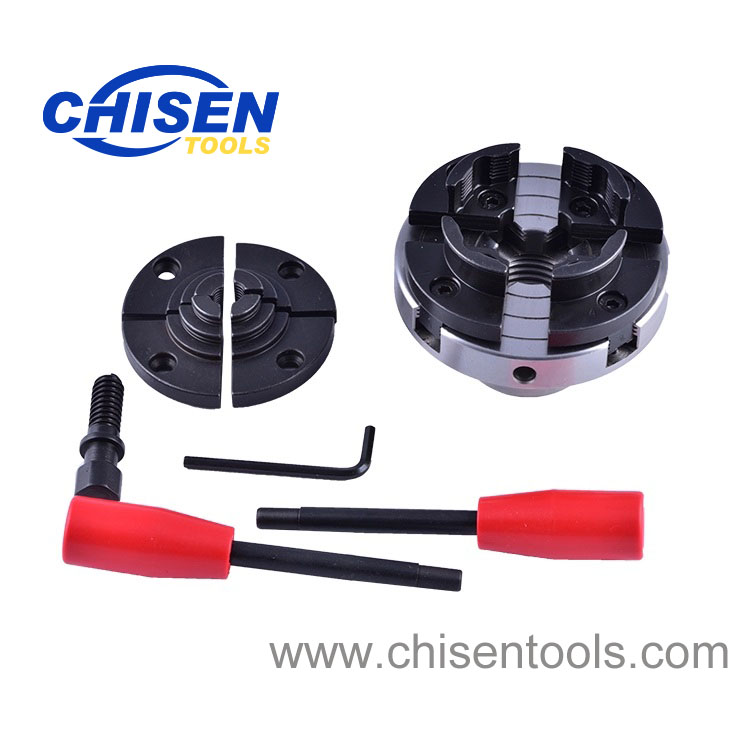
There are several components to a four-jaw wood chuck. The most obvious element is the jaws. Typically the jaws are attached to the chuck with a couple of recessed machine screws. This easy connection is important, because it allows for quick access when changing jaws.
Yes, in most cases the jaws of a wood bowl chuck can be changed. We’ll discuss this a bit more shortly.
The jaws are attached to the jaw slides. Jaw slides are moving parts that expand or contract when the internal mechanism of the wood chuck is adjusted. The internal mechanism contains a scroll ring that allows all four jaws to move in unison when adjusted.
Adjusting the jaws is done with a tool or key typically provided with the chuck. The most common form of adjusting a four-jaw chuck is by rotating an inset on the side of the chuck with a hex tool or chuck key. Usually, there are two inset screw points on opposite sides of the chuck to accomplish this process.
SIZE MATTERS
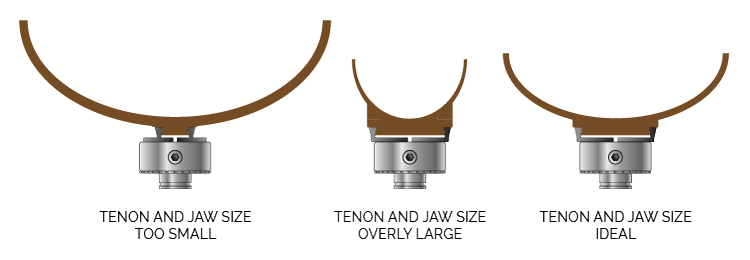
The first thing to consider when purchasing a four-jaw chuck for turning wood bowls is the size of the bowls you will be turning.
A rule of thumb ratio, depending upon to whom you talk, is about 30 to 40 percent base to diameter. In other words, it is a good idea to have a tenon or foot on a turned bowl that is at least 30 to 40 percent the size of the largest diameter of the bowl. So, a 10-inch diameter bowl should have approximately a three- to four-inch tenon on the base.
In the 30 to 40 percent size range, the four-jaw chuck will perform well and provide ample support and stability. A three-inch tenon on a 20-inch bowl would not offer enough support nor stability. Likewise, it’s a bit of overkill if we use an eight-inch four-jaw chuck with an eight-inch diameter bowl.
Most bowls are much shorter than they are wide. However, in the process of making a taller bowl or hollow form, the ratio of tenon size to diameter changes.
This change is necessary, because the wood form has moved away from the headstock. The farther the turned piece moves away from the headstock, or the longer it is, the more vibration and instability may occur. However, for wood bowl turning, the 30-40% rule is a good place to begin.
First Wood Chuck
If you are starting out and have not turned a bowl yet, you will probably want to start with a small to moderately sized chuck, one that will allow for the creation of perhaps six- to eight-inch bowls. For example, this is an ideal chuck for small to medium wood bowl turning.
Keep in mind, depending upon the maker of the chuck, additional jaw options are usually available. I particularly like to use chucks that give me optional jaw sizes, but there are limits, of course. The chuck linked here also has afforadable optional larger jaws for creating larger bowls.
Usually, a chuck that offers a set of jaws with a two-inch diameter won’t have optional six-inch jaws, because the chuck mechanism that works with the two-inch jaws is not large enough, both in size and strength to handle six-inch jaws.
Tenon or Mortise
The jaws of a four-jaw wood chuck are designed to work on both sides. So if you turn a tenon, or a foot on the base of a bowl, the inside of the jaws grip the outside of that tenon. If you prefer to turn a mortise, or recessed area, instead of a tenon, the outside of the jaws will grip the interior mortise with outward pressure.
Personally, I prefer the tenon, because it allows me to have more design control over the final bottom design. Besides, I kind of like to conceal how the piece was attached to the lathe. A big mortise hole on the bottom of the bowl seems to give that little mystery away.
I do know some turners that turn mortises and use that space to hide decorative details and even epoxy coins as an added treat for people who closely examine the bowl.
However, I still remember the days when I didn’t know much about bowl turning, and it was awe inspiring to turn over a piece and wonder how it was created. “How was that attached to the lathe?” I remember asking myself.

Mortise Pitfalls
Most of the bowls I turn are side-grain oriented. Side-grain bowl blanks can work well with either tenon or mortise connections.
Side-grain bowls with narrow or small bases may not have enough material to handle the outward pressure of the wood chuck in a mortise configuration.
If you turn end-grain bowls, I would advise against using a mortise connection. The wood chuck will simply expand and stretch the end grain fibers in most cases. Cracked end-grain fibers make for a weak and unstable wood chuck joint.
On the other hand, tenon compression with a wood chuck makes a firm hold on end grain bowl tenons and compacts wood fibers for a good grip.
Headstock Spindle Size
Another thing to know before you select a four-jaw chuck is the headstock spindle size of your lathe. The spindle size is expressed in diameter and thread count. My lathe headstock spindle measures 1-1/4” by 8, which is a pretty common size, but there are several other sizes.
Check your lathe manual of manufacturer’s website and make a note of your headstock spindle size. I’ve had to write mine down, because for some reason I seem to forget, especially when all the size options are offered.
Many manufacturers use inserts that will accommodate your specific lathe size. The interesting thing about this is if you have more than one lathe and they have different sized headstock spindle inserts, you can potentially purchase an inexpensive insert for each lathe and use the same chuck on both.
Another option is to use step-down or step-up adjustment pieces available to accommodate different sized headstock spindles. An adapter can be used to fit a 1” wood chuck on a 1-1/4” lathe spindle.
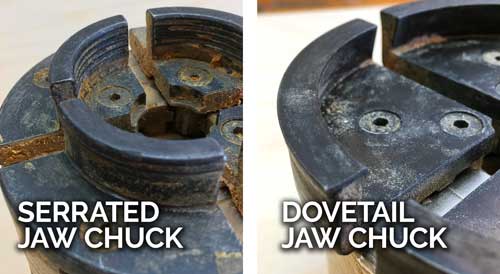
Dovetails or Serrated Teeth
The jaws of a four-jaw chuck need to have a way to hold onto the wood. After all, if the jaws were simply cylindrical quarter sections, the wood would come loose and shoot off the lathe.
On both sides of the jaws are either dovetail or serrated teeth (or grooves). I prefer dovetail jaws. While the learning to make a tenon properly may take slightly more time, dovetail jaws hold much better than the serrated teeth jaws.
The only time I’ve had an issue with dovetail jaws is when I’ve overtightened them on a tenon bowl blank that was dry and fragile wood. The tenon sheared off and the bowl fell to the ground. My guess is that would have happened with the toothed jaws as well.
I have had several pieces come loose while being held by toothed jaws. Typically the bowl, after taking an aggressive cut, will come loose in the toothed jaw chuck and vibrate off center. Re-centering the piece and continuing isn’t as easy as one might think. I stick to the dovetail jaws, and they hold on with great success.
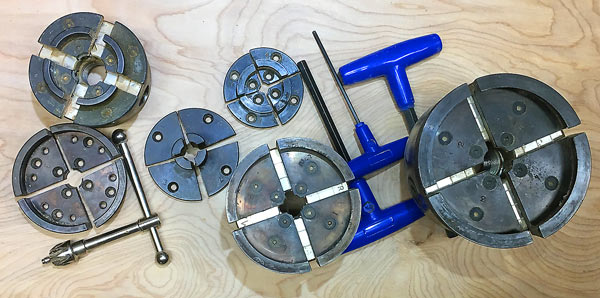
Wood Bowl Chuck Options
The final aspect to consider when selecting a four-jaw wood bowl chuck is the optional jaws available for a particular chuck.
Personally, I own three chucks. I have one that came with multiple jaws. I use that particular chuck for small turning projects. I also have two larger dovetail jawed chucks; each has several optional jaw size configurations.
I’ve found that I use about three different tenon sizes while making bowls: a small about 2” size, a medium 4”, and a larger 5” size for bigger bowls.
If I choose so down the road, there are larger jaws for my largest chuck that will allow me to turn bowls with a six- to eight-inch tenon – BIG bowls. But for now, I’ve found these sizes work well.
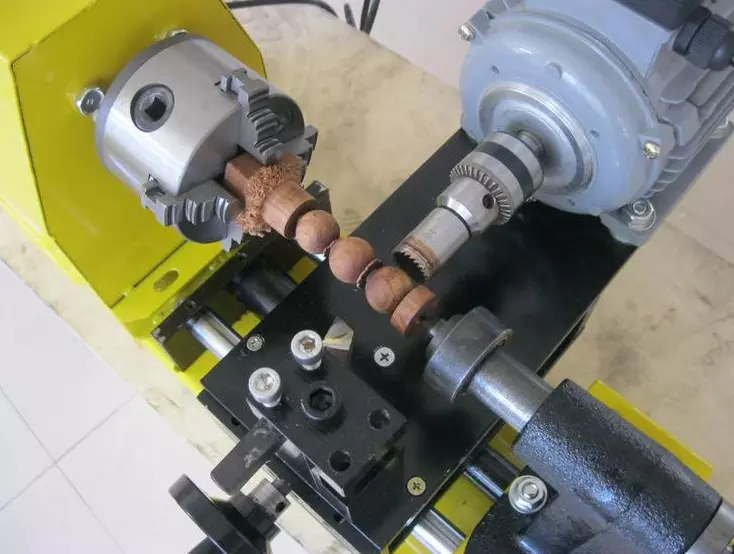
The Process of Using a Four-jaw Chuck
I will first share with you the main way I use the four-jaw chuck in my bowl turning process. Then I will show you how you can turn a bowl entirely using a four-jaw chuck.
Most bowls I turn are medium to large, approximately 10-15 inches in diameter. Because of this size, I want good stability, and I’ve found that initially starting a wood bowl blank with a faceplate offers that stability.
Here are the steps, in which I incorporate a four-jaw wood bowl chuck while making most of my bowls:
- center and mount wood bowl blank to a faceplate
- rough turn bottom shape of the bowl
- form tenon to the size of four-jaw chucks
- sand exterior of the bowl
- remove bowl from the lathe
- remove the faceplate
- mount four-jaw chuck to lathe
- mount bowl tenon to four-jaw chuck
- turn interior of the bowl
- sand interior of the bowl
- finish bowl
- remove bowl from four-jaw chuck
- insert jam chuck in four-jaw chuck
- mount bowl reversed to jam chuck with tailstock support
- turn off the tenon
- sand bowl bottom area
- finish bottom
Sizing Tenon to Wood Bowl Chuck
Sizing and turning a secure wood bowl tenon starts by determining the correct tenon size.
While the jaw slides on the chuck move the jaws a great distance in and out, this IS NOT to fit just any sized tenon. The size of the jaws completely dictates the size of the tenon used on the wood bowl.
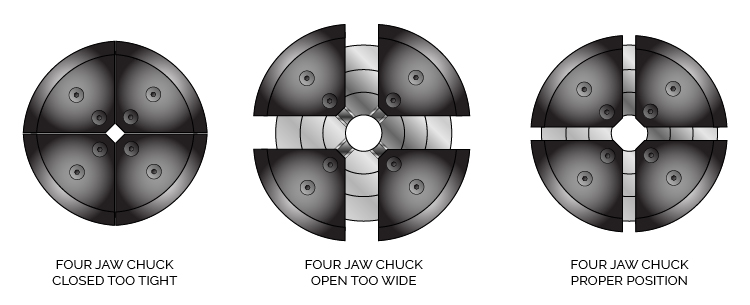
The wood bowl chuck jaw is turned as one piece when the four-jaw chuck is manufactured, ironically on a metal lathe. Once the jaw “ring” is complete, it is cut into quarters making the four jaws we use on the chuck.
Because the jaws were cut apart, there needs to be a slight gap when closing them down on a tenon, to form the original true circle. We never want all four jaws touching each other when tightened.
That is also the limit at which they can grip. So if the tenon is turned a bit too small and the jaws all touch, there’s a good chance the tenon is loose inside the chuck, which is definitely not something we want.
If the tenon is oversized, say a five-inch tenon for three-inch jaws, the inside rim of the jaws will only be making minimal contact with the circle of the tenon—also something we do not want. The ideal sized tenon is just slightly larger than the four jaws and leaves a small gap between jaws once the chuck is snug on the wooden bowl tenon.
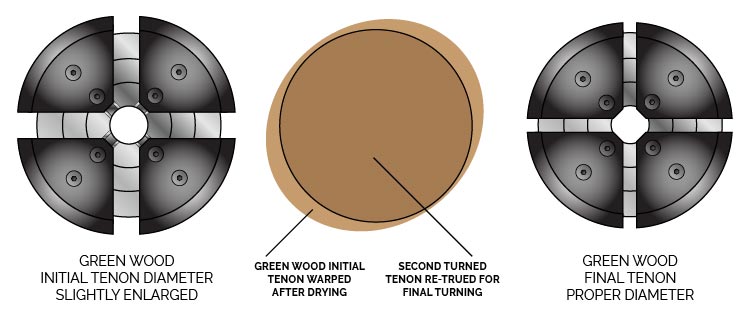
Twice Turning and Tenon Size
If you are turning green wood into a rough bowl shape and then drying the bowl to later re-turn to the final shape, the first tenon needs to be bigger.
I know this flies in the face of what I just said above, but think about it. The green wood tenon will stretch and shrink as it dries. Once dry, the roughed bowl tenon will need to be re-trued or made round again. This process will remove material.
It is important to start with a bit of extra material on the green wood tenon, knowing a portion of that will be removed later, making the final ideal sized tenon.
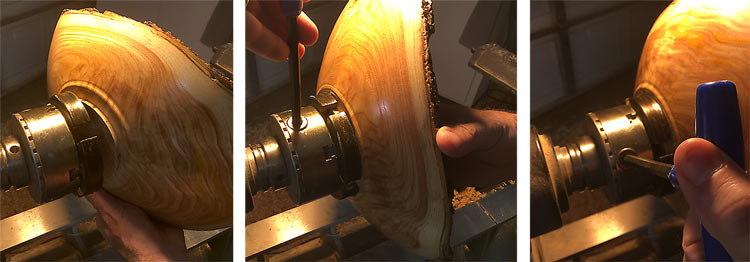
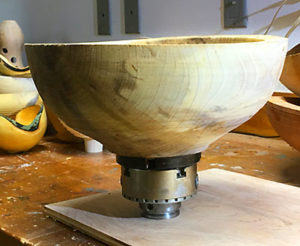
Mounting Bowl Tenon to the Four-jaw Chuck
Mounting the bowl tenon flush and square to the four-jaw chuck is simple, but critically important. With a properly turned tenon, this is not a problem at all.
Check for any debris that may be on or around the tenon and also look at the jaws and make sure they are free from any shavings or debris.
Expand the jaws wide enough to insert the tenon freely. Never force or push the tenon into the chuck, as this might damage the tenon.
Once the tenon is inside the jaws, hold it loosely and slowly tighten the jaws using the chuck key or hex wrench. When the jaws start to make contact, lightly apply pressure to the center of the bowl, seating it squarely on the top of each jaw section.
Snug up the jaw grip and, while continuing to apply pressure to the inside of the bowl, rotate the chuck and tighten the opposite chuck adjustment point. Slow opposite tightening will balance tension and prevent the bowl from being too tight on one side or the other.
Firm up the chuck until it is tight and the bowl does not move within the chuck. Don’t over tighten, as this might damage the tenon.
With green or wet wood, it’s a good idea to check frequently and tighten the chuck as needed. Most dry woods will not move once tight, but every wood and each bowl blank is different. So, check the chuck tightness and snug it up as needed.
Mounting Bowl Mortise to Wood Chuck
The same process applies if you are attaching a bowl with a mortise to the four-jaw chuck, in reverse.
Before beginning, contract or close the chuck completely, then expand the jaws until they make contact with the recessed mortise. Then snug up the bowl as previously described.
Easy In and Out
If for some reason you need to remove the bowl from the four-jaw chuck before it is complete and return it to the chuck, make a small pencil mark on the outside of the bowl and the chuck. This will help to line up the bowl when you return it to the chuck.
Removing the bowl before it’s complete is not something I recommend, because I’ve found that once a bowl is removed from the chuck and re-seated, it almost is never true, again. Additional re-turning is needed to rebalance the piece in most cases.
If the piece needs to come off the lathe for whatever reason, take the entire chuck off and leave the bowl attached to the chuck. This will prevent the need to re-true the bowl when you return.
All-in-One Bowl Turning
Another way to use the four-jaw chuck to turn a wooden bowl is to incorporate the center screw chuck, which comes with most four-jaw chucks.
Simply open the jaws and insert the tail or knob end of the screw in-between the center of the four jaws. Tighten the jaws while seating the screw chuck in the middle. You may need to wiggle the screw around to find the seat and then tighten the jaws.
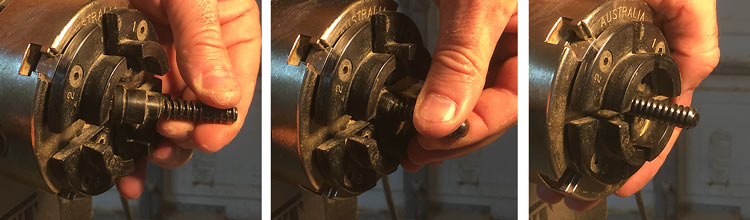
Now instead of using a faceplate in the example above, we’ll use the screw chuck to hold the bowl blank.
Drill a hole the diameter of the shank of the screw. This is the solid area in the middle of the screw, not including the threads.
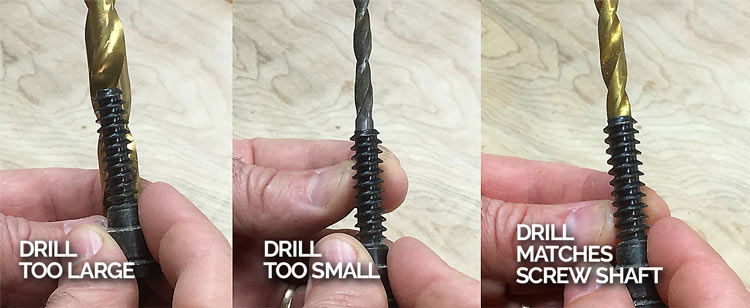
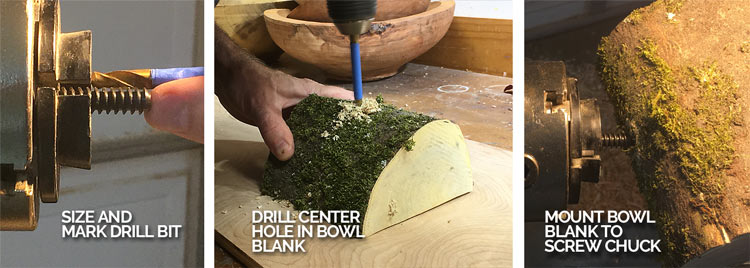
The easiest way to size the drill bit is to hold it up behind the screw chuck. The drill should match the size of the screw shank with the threads sticking out beyond.
Measure the length of the screw in the lathe, measuring from the screw tip to the top of the jaws. The bowl blank will seat on the top of the jaws. Use a piece of masking tape to mark the drill bit and drill a hole in the center of the wood bowl blank.
Once that is done, screw the bowl blank onto the screw chuck with the lathe off until it seats on the top of the jaws. Then continue with the steps from above. Once the tenon and outside shape is complete, unmount the bowl, open the jaws to remove the screw chuck and then mount the tenon into the jaws as explained previously.
Wood Chuck in Conclusion
The four-jaw wood bowl chuck is a versatile tool used to hold bowls securely and allow them to turn stable and true. As wood bowl turners, we need to be thankful this incredibly helpful tool exists for our convenience.
While the four-jaw wood chuck is more expensive than faceplate only turning and other forms of mounting bowls to a lathe, there really is no other tool that allows such strength and security with merely a few twists of the wrist.